Thank you!

Thank you for stopping by!!!!
Showing posts with label sewing. Show all posts

Saturday, January 2, 2016

When Things Go Wrong - Use Your Seam Ripper


Happy New Year!

I'm looking forward to 2016!  
I know, I know, and I know that 
everyday is a new day, but for 
some reason when that number
 changes, introducing the 
New Year, it's a Big deal.  
There is something about it that 
makes us gear up to new resolutions,
 new goals, and new beginnings.

I need a lot of new beginnings 
and start overs.  So here I am 
to welcome 2016.  The last days
 of the year were used to remove 
all Christmas decorations and
 store them away!  It feels real
 good to have my living 
space cleaned for the New Year.

  Sure there is much more left to
 do, however, for now I can
sit in front of the fire place, 
and sip on some hot tea. 
 Snuggled up, it's a cold day!  
It really does feel like winter. 
 I love it! I even got to sleep in...
so wonderful!!!

My motto this year is going to be,
  When Things Go Wrong 
Use Your Seam Ripper!!!  

One of my most favorite tools, 
the seam ripper.   I couldn't
 image not having this tool 
in my sewing box! 
In fact, I believe I own 
eight of them...lol!


With this wonderful tool, 
the seam ripper, we can remove 
all those mistakes we've made.  
Carefully, inserting the blade
 underneath the thread to be cut, 
and removing the unwanted 
seam we just stitched, only
to be resewn. 

So why not treat life  
 the same way?  We
accomplish so much each day. 
There is nothing wrong with
allowing our seams to unravel,
to rip them out and be removed.
  
  Sometimes when we remove 
stitches from our fabric, we 
leave impressions of damage, even 
the fabric of our life may 
be weakened. We can always move
 forward and improve our mistakes 
or better yet, simply start over!

I know we can beat ourselves up
 for messing up. I've done a 
lot in 2015 and I want to 
encourage my readers not to 
take life so serious.  
Have fun with it!
  
 Remember 
When Things Go Wrong 
Use Your Seam Ripper!!! 


I hope you all have enjoyed this
 post and have been encouraged.
  First, of many to come!  

Let me
know what you think!  
Thank you for stopping by!  
Have a wonderful
year!!!

2 Corinthians 5:17

Therefore, if anyone is in Christ, the new creation has come: 
The old has gone, the new is here!


Monday, June 1, 2015

My #Vintage Sewing Machines

I thought for this post I would share some of my #vintage sewing machines.  Some I have information on and others I need to dig deeper and do more research.

A few years ago I inherited a Singer sewing machine that my dear Mother-in-law gave me. This machine is very special to me for that
reason.


Upon doing some research I discovered the year of my machine, 1910. It's in good condition and it comes with a few accessories.  I have not sewn on it, tested it yes, and it does work! It does need
some loving care which I've started to do.  
  

This next machine is a hand crank sewing machine. I received it from a dear friend of the family. I was so excited to receive it, but I didn't have any information on this cute machine. I thought it might be a Singer dating back from 1861.  But it does not say Singer any where on the machine.  The plate reads Beste Machine Der Welt Gesetzlugh Geschutzt.  Most likely it's from Germany.  The model number on the machine is 44191.  So if anyone has information about this machine, I would appreciate it.


My last machine to share  is a Singer Featherweight. I purchased this machine when I first started to quilt. I would take it along with me to classes and I just love it. My featherweight was manufactured in Scotland in 1949, because the prefix starts with the letter E.  If your machine starts with an A it was manufactured in the USA. 


Some great information that I gathered came from these web-sites.  Check them out!


 Ismacs 

I'm just learning more about all of these 
machines. How to care for them and what products are best to use to restore them.
You can even order parts for these
  vintage machines. 

I actually own a few more vintage sewing machines, not shown. I'll save them for a future post.

I understand I won't be using all of these machines. So once I get them cleaned up,
I plan on showing them off around the house.

Allow others to enjoy them too. 

If you own any #vintage sewing machine(s), please share
them!! 


Psalm 1:3

And he shall be like a tree planted by the rivers of 
water, that bringeth 
forth his fruit in his season; his leaf also shall not wither; and 
whatsoever he doeth shall prosper.


Wednesday, April 1, 2015

#DIY Happy Spring Banner For Easter


For Easter I decided to make 
this banner, Happy Spring!!!!


Supplies:  
A spool of 4" burlap ribbon
A piece of white paper to make your pattern
Pencil
Scissors
Measuring tape or ruler
Heat n Bond
 2" Letter stencils/ 3" Circle 
Pins
Iron
Fabric scraps (I used 6 different colors)
Black Fabric
Sewing Machine


I used this spool of burlap 
ribbon I purchased on sale at 
Hobby Lobby for $3.40. It's from 
the Robert Stanley Collection.  
 I was going to use the ribbon 
for a baby shower. Instead, I'm 
using it for my banner.


The ribbon is 4 inches wide.


I made a pattern, cutting the 
length 7 inches and the width 4 inches 
(7" L x 4" W)
Mark the center width, 2 inches.
To make the peaks I measured 
1 inch from one end of the pattern 
center and drew lines to each 
edge to make the points.


On the other end I folded the 
edge under 1/2 inch. I cut 12 pieces.
Five for "Happy," and six for "Spring, 
and one for the center space, to 
divide each word.


I gathered up some fabric from 
my stash, I also used black 
fabric. Not shown below.


Pick out some stencils to the size 
and shape you desire.  My 
letters are 2 inches in length, 
width varies according to
each letter.


You'll need some Heat n Bond.


Draw your letters on the smooth side of the Heat n Bond.  
Remember to reverse your letters!!


Follow manufacturer instructions. Press to the wrong side of fabric with a hot iron.  
I used a different fabric for each letter.


Cut around letter.


Then cut around drawn line.


Remove paper to reveal sticky 
film.  Repeat for each letter.


And repeat for each black circles.  Make 11.


I then placed a circle onto the 
burlap ribbon, and then pressed
 the letter on to the circle
 with a hot iron.  Repeat.


I measured my ribbon according to the designed length.  I cut mine 80 
inches, but then realized I 
wanted my banner longer.  So,
 I just added an extra loop
 on either side.  I used a purple 
sheer ribbon that was 5/8 inch 
wide.  Place the ribbon on the 
back side and insert 
under the folded edge and pin.   


When you are happy with the placement, take your banner and sew 1/8 inch on the top edge.


I then made a second sewing stitch 
by placing my presser foot on 
the edge of the first 
sewing line as shown.


On the ends of the ribbon I made 
loops so that I could
 hang my banner.
(Sorry I have no photo.)


He is Risen

Matthew 28:1-10


Tuesday, October 7, 2014

Halloween Fabric- What to Make???


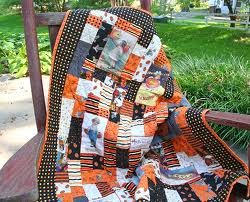
I've been working on my daughter in laws' baby shower!  So exciting because it's in two more weeks!  Once the shower is over I can post pictures, but not until.   

I just couldn't stay away from fabric.  I'm getting the itch to quilt. I thought I'd share some of my Halloween Fabric.  I'd really like to make a Mini #Halloween #Quilt or runner for my kitchen counter, but can't seem to decide on a pattern.  

Calling out for any suggestions.


Possible choices are:
(All images were found on the site below)


I guess you'll all have to wait to see what pattern I decide on!!!
Which one would you choose??


                                                   He Has Made Everything Beautiful In Its Time.  
Ecclesiastes 3:11  


Monday, May 5, 2014

Hollywood Sewalong Challenge - The Notebook Part 3 - The Big Reveal

Here's the finally reveal!  I wish you could 
hear the drum playing ta da!


I just love my new red polka dot dress inspired by the movie, 
" The Notebook." 

Because it was really hard to take pictures of 
me wearing the dress,    
 I had to take the dress off to capture 
some of the details of the dress!  You won't 
be getting any of those pictures... 
just kidding!  I didn't take any!


I used a cotton fabric with a low count of polyester!  
This keeps the dress casual and I felt like I could 
wear it more often. Even dress it up if I wanted too!
This dress has details from the 1940's. 

The pattern I used was 
McCall's 8181
View A


Please click on the links below to catch 
the girls that put this challenge together
and check out their finished project!  I can't 
wait to check them out myself!!!


Please leave me some comments!  
I would love to hear from you all!!


Thank you for visiting!!!


He Has Made Everything Beautiful In Its Time.  
                                                    
Ecclesiastes 3:11


Monday, March 31, 2014

30/30 Sewing Challenge Complete

All of my finished sewing projects planned for the 30/30 Sewing Challenge complete.  I was so glad to take part in this challenge.  It helped me to create a good habit of sewing.  I  have to be honest there were days I just didn't have the energy to sew, but I did.  I'd actually put the timer on and sewed exactly 30 minutes.   It also helped me to use my stash!  Fabrics I've had for along time.  You wouldn't happen to know what I'm talking about...lol!   


So often we don't always take time to sew for ourselves.  We get to busy sewing and creating for others.  I do plan on making it more of a habit to sew and build my clothes with the kind of things I love.   


30/30 Sewing Challenge Week 1  


30/30 Sewing Challenge Week 2 


30/30 Sewing Challenge Week 4


I want to thank Sarah from Berry Barn Designs for the challenge of sewing selfishly for ourselves for 30 minutes  each day for 30 days!!!!   

Also, I appreciate everyones comments and thanks to those who took part in the challenge.  I was really inspired by all the different projects worked on and completed during this challenge!!

Happy Sewing!!