Thank you!

Thank you for stopping by!!!!
Showing posts with label quilt. Show all posts

Monday, January 11, 2016

Farm Girl Vintage Blocks (13-18) Part 3

#farmgirlfridays


Getting my sewing on with once again Farm Girl Vintage blocks by Lori 
Holt!  Six more blocks!  


Egg Basket Block
#eggbasket


Farm Fresh Flower Block
#farmfreshflower


Farmhouse Block
#farmhouse


Feed and Seed Block
#feedandseed


this one was 


Fresh Pears Block
#freshpears


Furrows Block
#furrows 


Check out my 
other blocks 


----


 I am so excited to share that I won second and will
be receiving my Weekly Photo Calendar very soon 
in the mail!!  I can't wait!!

Thank you Yvonne for hosting this giveaway!!!

Check out her blog by clicking below!!


Psalms 143:5

I remember the days of old;
 I meditate on all that you have done; 
I ponder the work of your hands.

Monday, December 14, 2015

Mug Rugs


I haven't posted much lately, 
sad! However, I've been
 busy doing things.  Recently, 
I've made a couple Dog Gone 
Cute mug rugs using   
pattern. #dgcqal


I just love this pattern! I made 
two of the smaller blocks
 and added a strip of white to 
embroider the names of 
these two cute pet's name!

Quilted around these cute
faces and zigzagged 
the binding!


Simple, yet cute!
I plan on making a whole
litter of them too!


Monday, November 23, 2015

New Charm Packs


Ordered some new Charm packs
from the Fat Quarter Shop
with my $50 gift card!!!
You can place your 
order here too!!

Can't wait to open 
up these sweet packs
and start creating!!!!


     Not only did I get four packs but six!!


       Ooooh la la!!!

       I'd like to take this time
             and wish each and every one 
      of you a Blessed and
      Happy Thanksgiving Day!!

       Thank you all for
        stopping by!! hugs


         Here are some Thanksgiving 
        quilt ideas on my 
        Pinterest Board here


    Philippians 4:13


          I can do all things
          through Christ which
          strengtheneth me.


Monday, October 12, 2015

Tiny (Tim) Quilt


Recently, I've been interested in 
making some tiny quilts.  These #tiny
 #quilts would add a splash of 
color to my already  adorable 
 sewing machines 
I have displayed around the house.

I was hoping to finish up a few of
these cute quilts, but was only able
to get one completed.

I purchased the pattern 
The small book is called T for Tiny
and you get a total 
of six quilts.


I used scraps from my stash.  
Cut, marked and


assembled my blocks.  A total
of twelve blocks. T for Tiny
was the name of the block
used in the book, but while sewing
I decided to name it T for Tiny Tim,
after my youngest son.  
Haha! 


Attached by blocks


Sandwiched my Tiny Tim quilt.


Here's the back of my tiny quilt.


Sewed the binding and attached a

label to the back of my quilt.


Here you have it. An adorable
 quilt displayed with my 
antique sewing machine.


A note of caution!  While making
this quilt, I did have to adjust 
the pattern some.  My finished
quilt measures 10-1/2" x 13". In
the book it measured 8-3/4" x 11".

I don't know about the other quilts
in the book.  I do plan on making 
more.  You do get a total of six
quilt patterns in the book.

Thanks for stopping by!!!


Philippians 4:13
I can do all things
through Christ which
 strengtheneth me. 


Tuesday, September 8, 2015

My Favorite Sewing Weapon Against Lint


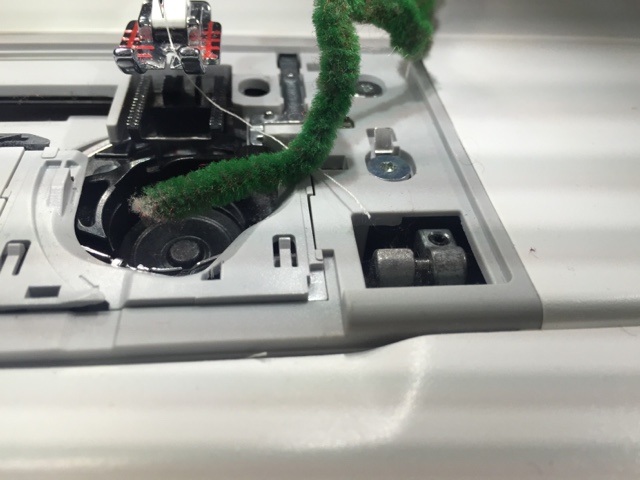
What does a pipe cleaner have to 
do with sewing?  Well, let me tell
 you, it's one of my favorite tools.

I discovered it years ago,  and have
 been using it ever since.


I'd love to share it with you!

That favorite tool of mine 
happens to be a pipe cleaner.

I use pipe cleaners to clean my 
sewing machines from lint that 
gathers into my machine from  the
fibers of the fabric while
I sew, quilt or craft.


It fits in all the nooks
and crannies of your machine, whether
it be a serger or a regular 
sewing machine.   I guess you
can use it for your belly button lint, 
too, haha, just kidding!


It's such a great tool.  Once you
go in and remove the lint from
your machines, you just wipe
off the lint on your pipe
cleaner and you can
reuse that pike cleaner 
over and over.


So make a pipe cleaner part of your
sewing tools.  They don't cost
much and pipe cleaners
work great to get to those 
unreachable places of your 
sewing machines.


What's your favorite 
sewing tool?  


Ecclesiastes 3:11
He hath made every thing beautiful in His time


Monday, August 31, 2015

Sneak Peak Dog Gone Cute!

I've been so excited to show of my 
Dog Gone Cute block from 


Just a sneak peak!


More blocks to come!!

Woof woof!


Head on over and get your copy!
Still time to join!


Sew Fresh Quilts


Ecclesiastes 3:11

He hath made every thing beautiful in His time

Tuesday, August 25, 2015

Flight / 54-40 Quilt Block


Fabrics from my stash!!!  


I decided to make these quilt blocks 
from fabric I already had. I ended up making four blocks of each color, green, purple and pink, ending up with 12 blocks.  Just got the blocks done. Yeah!!!!


This block is a combination
of an eight pointed star
and four block squares


I haven't had time to sew the
 blocks together.  Once I do, I will
 share my quilt with you!!

I'm excited to see them put together.


Thank you for stopping by!!!


Psalm 100:5a


For the Lord is good and
his love endures forever...


Tuesday, August 4, 2015

Log Cabin Table Top Quilt


#Logcabinquilt

#tutorial


I've been busy quilting away on this log cabin quilt.  It's for a gift for my husband's Aunt and Uncle.

The finished quilt measures
25-1/2" x 25-1/2"

I used thirteen different fabrics
from my stash to complete this quilt. 

 The center square is a
barn red color fabric, which you 
won't see on the strips below, 
but you will see the 
red square on the examples 
following the strips.  Each strip
was cut 1-3/4" wide by the
length of fabric.  Depending on
the length of your fabric you 
may have to cut two or three
strips of some fabrics.


I find it helpful to lay out the strips in
the order you will be sewing them. 
Center block- red
2 light color fabrics
2 darker color fabrics
2 light color fabrics
2 darker color fabrics
Repeat with 2 light and then 2 dark
fabrics if you desire your block
to be larger.

I started with a 1-3/4" 
square.  Cut one square
for each block you plan on making.
I have nine log cabin blocks, so I cut
 nine red squares.


I took the next strip and placed
my red squares right sides
together and sewed a quarter inch  
seam allowance.


Trim to 1-3/4" square and press 
open. Add the next 1-3/4" strip.


Working counter-clockwise around the
center square, continue adding strips


Finished block 5-1/2" square.


Arrange your blocks to your 
liking and sew blocks
together. Your block should
measure 15-1/4" x 15-1/4".


I added two borders. Measure 
your quilt to get the proper size
of your quilt. The first
border (dark green) I cut
strips 1-3/4" wide by the length
of the fabric and attached
them to the top and then
to the bottom.  Next you will
 add the side border. 


My next border I cut 5-1/2" wide 
strips by the length of the 
fabric, and sewed them just like 
the first border. 

Sandwich your quilt together, backing,
batting and top.  Safety pin
or baste quilt to prepare
it for top stitching.  Remove
any safety pins you come
close to while top stitching.


Here you see me top stitching 
the quilt. Remove safety pins
as you top stitch.


Add your binding. Make a label for 
your quilt and it's ready to go.


Psalam 143:5
I remember the days of old;
 I meditate on all that you have done; 
I ponder the work of your hands.